I bought the Naked 2 palette over a year ago and I’m just now getting around to reviewing it. I absolutely ADORE this palette so I’m pretty disappointed in myself for not reviewing it earlier! :) Since there are 12 colors, I’m going to discuss them in sets of 3 to make it slightly more manageable.
First, the general information on the palette.
Naked 2 is made by Urban Decay, a fantastic brand.
Each shadow is 0.05 ounces, but they seriously last forever. I use Tease almost every day for my smokey eye and I see no evidence of hitting pan anytime soon. The palette also includes a decent quality double-sided brush: one fluffy side for blending and one flat side for a smooth application of a base color.
The Naked 2 palette can be purchased at Ulta, Macy’s, Sephora, and many other popular makeup retailers for $50. Believe me when I say it’s worth every penny!
Now, on to the photos :)
 Here is the outside view of the case. It’s metal and slightly heavy, but nothing extreme to carry around. I personally love the durability of it and I haven’t found a problem folding the top over to access the shadow panel more easily, as shown in the picture below. I’ve heard some people complain that the original Naked palette is much easier to fold over, but I don’t own it so I don’t have anything to compare it to. Overall, the packaging doesn’t bother me one bit.
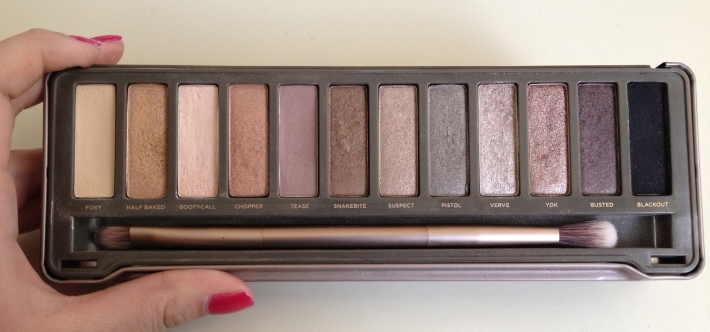
And here is the inside! You can see the brush in this picture. I don’t personally use it because I’m much too attached to my MAC 239 and 217 brushes, but it definitely works if you don’t want to spend the extra money on additional brushes! The eyeshadows pictured, from left to right, are:
Foxy, Half Baked, Bootycall, Chopper, Tease, Snakebite, Suspect, Pistol, Verve, YDK, Busted, and Blackout
We’ll start with Foxy, Half Baked, and Bootycall.

As you can see, the shadows have been swatched on my hand.
-Foxy is an extremely pale/yellow color, perfect for blending nudes, tans, and golds. I love it as a base when I want a very natural smokey eye. I usually apply my Urban Decay Primer Potion below each of these colors for a bolder and longer-lasting application, but in an attempt to save some money, I skimped on this review (sorry, I’m poor ;)). Foxy, along with the rest of the colors, is much more obvious when used over a primer.
-Half Baked is a beautiful gold shimmer. It’s subtle and shimmery without being too over the top. It pairs very well with Suspect, Snakebite, Foxy, and Bootycall. If you’re not a fan of sparkle fallout but still want a beautiful gold, this is the way to go. I’ll explain what I mean about glitter fallout when I talk about Chopper later.
-Bootycall is one of my staples. I use this almost daily alongside Tease. It matches my skincolor perfectly and adds a slight bit of shimmer without the glitter fallout. This is the perfect basic nude and blends so well with almost any skin tone.
Now moving on to Chopper, Tease, and Snakebite.


-Let’s start with Chopper :) this is a beautiful Gold color very similar to Half Baked. The only difference is that Chopper is more of a rose gold and Half Baked is more of a yellow gold. This color has the same consistency as Half Baked but has sparkles. I’m slightly more partial to matte shadows (like Tease) rather than sparkly shadows like Chopper because I’m not a huge fan of the glitter fallout. Chopper and YDK (pictured later) both contain tiny flecks of silver sparkles. This is beautiful for a a night out but the shadows are an absolute mess to apply. If they didn’t have glitter, I’d love them a whole lot more. However, when I have time to clean up the glitter under my eyes, this color is beautiful!
-Tease is my favorite color in this whole palette. When I run out of this color, I’m buying it in a single because I use it literally every single time I do a smokey eye. I find an excuse to add this color to every single look I do on my eyes. It’s so smooth and silky, I can’t help but blend it into everything! I don’t know if this formula is any different than the others, but it seems to blend SO wonderfully. Maybe it’s just the color. However, if you want a single color to put in your crease, just buy this in the single. It’s that good. The picture doesn’t nearly do it justice. Now I must stop myself from rambling and talk a little about Snakebite.
-This is a gorgeous warm brown. Looking at my palette now, I’m not so sure why it looks unused. It pairs beautifully with Suspect, Verve, Blackout, Bootycall, Foxy, and Half Baked. A WONDERFUL crease color or lid color if you’re going for a slightly more smokey look. I just blended it with Tease as an experiment and it’s surprisingly beautiful. In fact, immediately after I did it, a friend walked into my dorm and complimented my makeup. I just worked out so that’s pretty extreme ;)
Almost there! On to Suspect, Pistol, and Verve.

 -Suspect is a dimmed down version of Snakebite with a bit less red. I love using this one as a very subtle smokey eye. I’ve put this in the crease lightly as an accent to a dramatic winged liner. Too bold of a shadow will greatly distract from the winged liner and make it a look a little trashy… This solves the problem completely :)
-Pistol pairs beautifully with Blackout and Verve as a romantic and sexy smokey eye. I’ve also used it pressed into my liner to dim down the intensity and blend it out. It looks great pressed into the waterline as well. I think of this color as more of an accent because of my skin tone but it can totally stand alone with a beautiful liner.
-Verve is awesome for the corner of the eye. For more dramatic looks, I’ve dared to sweep it across my browbone. However, it’s quite bold. It looks great as light dusting of shadow for a relaxed day with a couple swipes of mascara or it can be packed on for an intense silvery shine. This color is so versatile and after swatching it again on my hand and really rubbing it, I see some true staying potential. This color, along with Pistol, is fantastic for accents.
Ready for the last 3? YDK, Busted, and Blackout

 -I have to be honest with you all. The main reason I bought this palette is because every single time I walked through Macy’s, I took a swipe of YDK on my finger and stared at its glittery beauty for the next 5 hours until it wore off with hand washing. Upon applying it to my lids after buying the entire palette, I wasn’t too impressed. As I mentioned before, YDK and Chopper contain a fine silver glitter. Now I’m sure this would be beautiful if it didn’t end up sprinkled on my cheeks and falling down my face like I cried sparkles. No, I’m not a fan. YDK is a glittered and shiny version of Tease. Like I said before, if you have the time to wipe the glitter off your face, GO FOR IT. It’s a beautiful color, but I like to do my foundation first and this is too inconvenient for everyday use.
-Busted is gorgeous. I think of it as a deep plum mixed with Tease. (So sorry for the constant comparisons with my absolute favorite color; it’s so versatile!). This is awesome in the crease with Foxy, Bootycall, or Pistol as a base. It also looks awesome mixed with Blackout to reduce the intensity of Blackout. Awesome crease color and if I learn to be brave I’ll try it on my lids smoked out.
-Blackout. Our last color. This is a great black if you’re looking for something not too intense. It’s a lighter black than most I’ve seen but I love adding it to the corner to darken up any shadows in this palette. The beauty of Blackout is that it can be added to literally any of the other 11 colors without messing up the pigment. It has a tiny bit of sparkle but stays matte. absolutely perfect if you don’t want a stand-alone black.
So that’s my full review. I hope you all enjoyed it and if you have any questions about any of the colors, feel free to comment on here and I’ll answer as abruptly as possible.
Thanks to all who took the time to read every rambling word. :)
XOXO,
Rachel


